Java Swing –Я–µ—А–≤—Л–µ –њ—А–Њ–≥—А–∞–Љ–Љ—Л
–Ь–∞—В–µ—А–Є–∞–ї –Є–Ј Wiki.crossplatform.ru
| –°—В—А–Њ–Ї–∞ 2: | –°—В—А–Њ–Ї–∞ 2: | ||
| - | == | + | == –Э–∞—И –њ–µ—А–≤—Л–є –њ—А–Є–Љ–µ—А—З–Є–Ї == |
| - | + | –Т –љ–∞—И–µ–Љ –њ–µ—А–≤–Њ–Љ –њ—А–Є–Љ–µ—А–µ –Љ—Л –њ–Њ–Ї–∞–ґ–µ–Љ –Њ—Б–љ–Њ–≤–љ–Њ–µ –Њ–Ї–љ–Њ. | |
<source lang="cpp"> | <source lang="cpp"> | ||
import javax.swing.JFrame; | import javax.swing.JFrame; | ||
| –°—В—А–Њ–Ї–∞ 25: | –°—В—А–Њ–Ї–∞ 25: | ||
} | } | ||
</source> | </source> | ||
| - | + | –Э–µ—Б–Љ–Њ—В—А—П –љ–∞ —В–Њ, —З—В–Њ –њ—А–Є–≤–µ–і–µ–љ–љ—Л–є —Д—А–∞–≥–Љ–µ–љ—В –Ї–Њ–і–∞ –і–Њ—Б—В–∞—В–Њ—З–љ–Њ –Љ–∞–ї, –Њ–Ї–љ–Њ –њ—А–Є–ї–Њ–ґ–µ–љ–Є—П –Љ–Њ–ґ–µ—В –і–µ–ї–∞—В—М –і–Њ—Б—В–∞—В–Њ—З–љ–Њ –Љ–љ–Њ–≥–Њ. –Ю–љ–Њ –Љ–Њ–ґ–µ—В –Є–Ј–Љ–µ–љ—П—В—М —А–∞–Ј–Љ–µ—А, –Љ–∞–Ї—Б–Є–Љ–Є–Ј–Є—А–Њ–≤–∞—В—М—Б—П, –Љ–Є–љ–Є–Љ–Є–Ј–Є—А–Њ–≤–∞—В—М—Б—П. –Я—А–Є —Н—В–Њ–Љ –≤—Б–µ —Б–ї–Њ–ґ–љ–Њ—Б—В–Є —А–µ–∞–ї–Є–Ј–∞—Ж–Є–Є —Б–Њ–Ї—А—Л—В—Л –Њ—В –њ—А–Є–Ї–ї–∞–і–љ–Њ–≥–Њ —А–∞–Ј—А–∞–±–Њ—В—З–Є–Ї–∞. | |
<source lang="cpp"> | <source lang="cpp"> | ||
import javax.swing.JFrame; | import javax.swing.JFrame; | ||
–Т–µ—А—Б–Є—П 11:09, 24 —Д–µ–≤—А–∞–ї—П 2009
–Т —Н—В–Њ–є –≥–ї–∞–≤–µ –Љ—Л –љ–∞–њ–Є—И–µ–Љ –љ–∞—И—Г –њ–µ—А–≤—Г—О –њ—А–Њ–≥—А–∞–Љ–Љ—Г –Є—Б–њ–Њ–ї–Ј—Г—П Swing. –Я—А–Є–Љ–µ—А –±—Г–і–µ—В –≤–µ—Б—М–Љ–∞ –њ—А–Њ—Б—В–µ–љ—М–Ї–Є–Љ. –С—Г–і–µ—В –Њ—Е–≤–∞—З–µ–љ–∞ –ї–Є—И—М –љ–µ–Ї–Њ—В–Њ—А–∞—П —З–∞—Б—В—М –Њ—Б–љ–Њ–≤–љ—Л—Е —Д—Г–љ–Ї—Ж–Є–Њ–љ–∞–ї—М–љ—Л—Е –≤–Њ–Ј–Љ–Њ–ґ–љ–Њ—Б—В–µ–є.
–°–Њ–і–µ—А–ґ–∞–љ–Є–µ |
–Э–∞—И –њ–µ—А–≤—Л–є –њ—А–Є–Љ–µ—А—З–Є–Ї
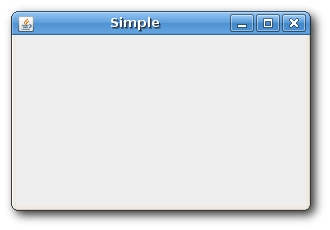
–Т –љ–∞—И–µ–Љ –њ–µ—А–≤–Њ–Љ –њ—А–Є–Љ–µ—А–µ –Љ—Л –њ–Њ–Ї–∞–ґ–µ–Љ –Њ—Б–љ–Њ–≤–љ–Њ–µ –Њ–Ї–љ–Њ.
import javax.swing.JFrame;


public class Simple extends JFrame {

    public Simple() {

        setSize(300, 200);
        setTitle("Simple");
        setDefaultCloseOperation(EXIT_ON_CLOSE);
   }

    public static void main(String[] args) {

        Simple simple = new Simple();
        simple.setVisible(true);

    }
}
–Э–µ—Б–Љ–Њ—В—А—П –љ–∞ —В–Њ, —З—В–Њ –њ—А–Є–≤–µ–і–µ–љ–љ—Л–є —Д—А–∞–≥–Љ–µ–љ—В –Ї–Њ–і–∞ –і–Њ—Б—В–∞—В–Њ—З–љ–Њ –Љ–∞–ї, –Њ–Ї–љ–Њ –њ—А–Є–ї–Њ–ґ–µ–љ–Є—П –Љ–Њ–ґ–µ—В –і–µ–ї–∞—В—М –і–Њ—Б—В–∞—В–Њ—З–љ–Њ –Љ–љ–Њ–≥–Њ. –Ю–љ–Њ –Љ–Њ–ґ–µ—В –Є–Ј–Љ–µ–љ—П—В—М —А–∞–Ј–Љ–µ—А, –Љ–∞–Ї—Б–Є–Љ–Є–Ј–Є—А–Њ–≤–∞—В—М—Б—П, –Љ–Є–љ–Є–Љ–Є–Ј–Є—А–Њ–≤–∞—В—М—Б—П. –Я—А–Є —Н—В–Њ–Љ –≤—Б–µ —Б–ї–Њ–ґ–љ–Њ—Б—В–Є —А–µ–∞–ї–Є–Ј–∞—Ж–Є–Є —Б–Њ–Ї—А—Л—В—Л –Њ—В –њ—А–Є–Ї–ї–∞–і–љ–Њ–≥–Њ —А–∞–Ј—А–∞–±–Њ—В—З–Є–Ї–∞.
import javax.swing.JFrame;
Here we import the JFrame widget. It is a toplevel container, which is used for placing other widgets.
 setSize(300, 200);
 setTitle("Simple");
This code will resize the window to be 300px wide and 200px tall. It will set the title of the window to Simple.
setDefaultCloseOperation(EXIT_ON_CLOSE);
This method will close the window, if we click on the close button. By default nothing happens.
Centering window on the screen
By default, when the window is shown on the screen, it is not centered. It will pop up most likely in the upper left corner. The following code example will show the window centered on the screen.
import java.awt.Dimension;
import java.awt.Toolkit;

import javax.swing.JFrame;

public class CenterOnScreen extends JFrame {

    public CenterOnScreen() {

        setSize(300, 200);
        setTitle("CenterOnScreen");
        setDefaultCloseOperation(EXIT_ON_CLOSE);

        Toolkit toolkit = getToolkit();
        Dimension size = toolkit.getScreenSize();
        setLocation(size.width/2 - getWidth()/2,
		size.height/2 - getHeight()/2);
    }

    public static void main(String[] args) {

        CenterOnScreen cos = new CenterOnScreen();
        cos.setVisible(true);

    }
}
To center the window on the screen, we must know the resolution of the monitor. For this, we use the Toolkit class.
 Toolkit toolkit = getToolkit();
 Dimension size = toolkit.getScreenSize();
We get the toolkit and figure out the screen size.
setLocation(size.width/2 - getWidth()/2, size.height/2 - getHeight()/2);
To place the window on the screen, we call the setLocation() method.
Buttons
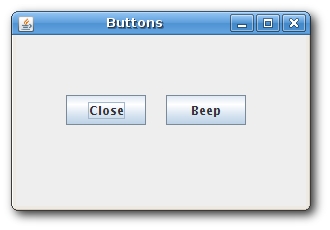
In our next example, we will show two buttons. The first button will beep a sound and the second button will close the window.
import java.awt.Dimension;
import java.awt.Toolkit;
import java.awt.event.ActionEvent;
import java.awt.event.ActionListener;

import javax.swing.JButton;
import javax.swing.JFrame;
import javax.swing.JPanel;


public class Buttons extends JFrame {

    private Toolkit toolkit;

    public Buttons() {

        setTitle("Buttons");
        setSize(300, 200);

        toolkit = getToolkit();
        Dimension size = toolkit.getScreenSize();
        setLocation((size.width - getWidth())/2, (size.height - getHeight())/2);
        setDefaultCloseOperation(EXIT_ON_CLOSE);

        JPanel panel = new JPanel();
        getContentPane().add(panel);

	panel.setLayout(null);

        JButton beep = new JButton("Beep");
        beep.setBounds(150, 60, 80, 30);
        beep.addActionListener(new ActionListener() {
            public void actionPerformed(ActionEvent event) {
                toolkit.beep();
            }
        });

       JButton close = new JButton("Close");
       close.setBounds(50, 60, 80, 30);
       close.addActionListener(new ActionListener() {
           public void actionPerformed(ActionEvent event) {
               System.exit(0);
          }
       });

        panel.add(beep);
        panel.add(close);

    }

    public static void main(String[] args) {

        Buttons buttons = new Buttons();
        buttons.setVisible(true);

    }
}
In this example, we will see two new topics. Layout management and event handling. They will be touched only briefly. Both of the topics will have their own chapter.
 JPanel panel = new JPanel();
 getContentPane().add(panel);
We create a JPanel component. It is a generic lightweight container. We add the JPanel to the JFrame.
panel.setLayout(null);
By default, the JPanel has a FlowLayout manager. The layout manager is used to place widgets onto the containers. If we call setLayout(null) we can position our components absolutely. For this, we use the setBounds() method.
 JButton beep = new JButton("Beep");
 beep.setBounds(150, 60, 80, 30);
 beep.addActionListener(new ActionListener() {
     public void actionPerformed(ActionEvent event) {
         toolkit.beep();
     }
 });
Here we create a button. We position it by calling the setBounds() method. Then we add an action listener. The action listener will be called, when we perform an action on the button. In our case, if we click on the button. The beep button will play a simple beep sound.
System.exit(0);
The close button will exit the application. For this, we call the System.exit() method.
 panel.add(beep);
 panel.add(close);
In order to show the buttons, we must add them to the panel.
A tooltip
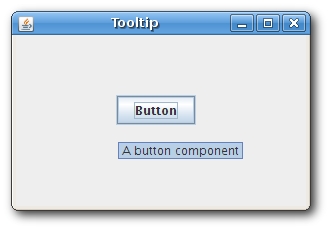
Tooltips are part of the internal application's help system. The Swing shows a small rectangular window, if we hover a mouse pointer over an object.
import java.awt.Dimension;
import java.awt.Toolkit;

import javax.swing.JButton;
import javax.swing.JFrame;
import javax.swing.JPanel;


public class Tooltip extends JFrame {

    private Toolkit toolkit;

    public Tooltip() {

        setTitle("Tooltip");
        setSize(300, 200);

        toolkit = getToolkit();
        Dimension size = toolkit.getScreenSize();
        setLocation((size.width - getWidth())/2, (size.height - getHeight())/2);
        setDefaultCloseOperation(EXIT_ON_CLOSE);

        JPanel panel = new JPanel();
        getContentPane().add(panel);

        panel.setLayout(null);
        panel.setToolTipText("A Panel container");

        JButton button = new JButton("Button");
        button.setBounds(100, 60, 80, 30);
        button.setToolTipText("A button component");

        panel.add(button);

    }

    public static void main(String[] args) {

        Tooltip tooltip = new Tooltip();
        tooltip.setVisible(true);

    }
}
In the example, we set the tooltip for the frame and the button.
panel.setToolTipText("A Panel container");
To enable a tooltip, we call the setTooltipText() method.


