Java Gnome FAQ Drawing with cairo
РңР°СӮРөСҖиал РёР· Wiki.crossplatform.ru
(РқРҫРІР°СҸ: In this part of the Java programming tutorial, we will do some drawing with the Cairo library. <b>Cairo</b> is a library for creating 2D vector graphics. We can use it to draw our own ...)
РЎР»РөРҙСғСҺСүР°СҸ РҝСҖавРәР° вҶ’
Р’РөСҖСҒРёСҸ 09:23, 19 РјР°СҖСӮР° 2009
In this part of the Java programming tutorial, we will do some drawing with the Cairo library.
Cairo is a library for creating 2D vector graphics. We can use it to draw our own widgets, charts or various effects or animations.
РЎРҫРҙРөСҖжаРҪРёРө |
Simple drawing
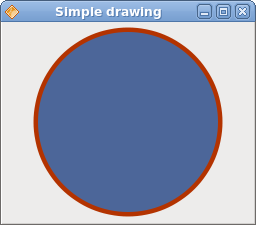
The stroke operation draws the outlines of shapes and the fill operation fills the insides of shapes. Next we will demonstrate these two operations.
package com.zetcode;

import org.freedesktop.cairo.Context;

import org.gnome.gdk.Event;
import org.gnome.gdk.EventExpose;
import org.gnome.gtk.Allocation;
import org.gnome.gtk.DrawingArea;
import org.gnome.gtk.Gtk;
import org.gnome.gtk.Widget;
import org.gnome.gtk.Window;
import org.gnome.gtk.WindowPosition;

/**
 * Java Gnome tutorial
 *
 * This program draws a simple
 * drawing with the Cairo library.
 *
 * @author jan bodnar
 * website zetcode.com
 * last modified March 2009
 */

public class GSimpleDrawing extends Window implements Widget.ExposeEvent {

    public GSimpleDrawing() {

        setTitle("Simple drawing");

        initUI();

        connect(new Window.DeleteEvent() {
            public boolean onDeleteEvent(Widget source, Event event) {
                Gtk.mainQuit();
                return false;
            }
        });

        setDefaultSize(250, 200);
        setPosition(WindowPosition.CENTER);
        showAll();
    }

    public void initUI() {
        DrawingArea darea = new DrawingArea();
        darea.connect(this);
        add(darea);
    }

    public boolean onExposeEvent(Widget widget, EventExpose eventExpose) {
        final Context cr;

        cr = new Context(widget.getWindow());
        drawShape(cr);

        return false;
    }

    public void drawShape(Context cr) {

        cr.setLineWidth(9);
        cr.setSource(0.7, 0.2, 0.0);

        int width, height;
        width = getAllocation().getWidth();
        height = getAllocation().getHeight();

        cr.translate(width/2, height/2);
        cr.arc(0, 0, (width < height ? width : height) / 2 - 10, 0, 2*Math.PI);
        cr.strokePreserve();

        cr.setSource(0.3, 0.4, 0.6);
        cr.fill();
    }

    public static void main(String[] args) {
        Gtk.init(args);
        new GSimpleDrawing();
        Gtk.main();
    }
}
In our example, we will draw a circle and fill it with a solid color.
DrawingArea darea = new DrawingArea();
We will be doing our drawing operations on the DrawingArea widget.
  public boolean onExposeEvent(Widget widget, EventExpose eventExpose) {
    final Context cr;

    cr = new Context(widget.getWindow());
    drawShape(cr);

    return false;
 }
When the window needs to be redrawn, the ExposeEvent is created. The actual drawing is delegated to the drawShape() method.
cr = new Context(widget.getWindow());
We create the Context object from the gdk window of the drawing area. The context is an object onto which we do all our drawings.
cr.setLineWidth(9);
We set the width of the line to 9 pixels.
cr.setSource(0.7, 0.2, 0.0);
We set the color to dark red.
 int width, height;
 width = getAllocation().getWidth();
 height = getAllocation().getHeight();

 cr.translate(width/2, height/2);
We get the width and height of the drawing area. We move the origin into the middle of the window.
 cr.arc(0, 0, (width < height ? width : height) / 2 - 10, 0, 2*Math.PI);
 cr.strokePreserve();
We draw the outside shape of a circle. The strokePreserve() strokes the current path according to the current line width, line join, line cap, and dash settings. Unlike the stroke(), it preserves the path within the cairo context.
 cr.setSource(0.3, 0.4, 0.6);
 cr.fill();
This fills the interior of the circle with some blue color.
Basic shapes
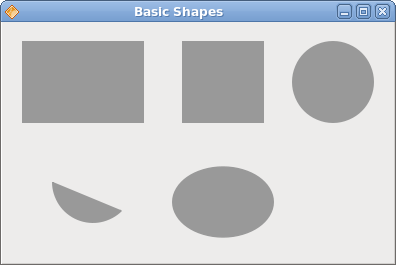
The next example draws some basic shapes onto the window.
package com.zetcode;

import org.freedesktop.cairo.Context;
import org.freedesktop.cairo.Matrix;

import org.gnome.gdk.Event;
import org.gnome.gdk.EventExpose;
import org.gnome.gtk.DrawingArea;
import org.gnome.gtk.Gtk;
import org.gnome.gtk.Widget;
import org.gnome.gtk.Window;
import org.gnome.gtk.WindowPosition;


/**
 * ZetCode Java Gnome tutorial
 *
 * This program draws basic shapes
 * with the cairo library.
 *
 * @author jan bodnar
 * website zetcode.com
 * last modified March 2009
 */

public class GBasicShapes extends Window implements Window.ExposeEvent {

    public GBasicShapes() {

        setTitle("Basic Shapes");

        initUI();

        connect(new Window.DeleteEvent() {
            public boolean onDeleteEvent(Widget source, Event event) {
                Gtk.mainQuit();
                return false;
            }
        });

        setDefaultSize(390, 240);
        setPosition(WindowPosition.CENTER);
        showAll();
    }

    public void initUI() {
        DrawingArea darea = new DrawingArea();
        darea.connect(this);
        add(darea);
    }

    public boolean onExposeEvent(Widget widget, EventExpose eventExpose) {
        final Context cr;

        cr = new Context(widget.getWindow());
        drawShapes(cr);

        return false;
    }

    public void drawShapes(Context cr) {

        cr.setSource(0.6, 0.6, 0.6);

        cr.rectangle(20, 20, 120, 80);
        cr.rectangle(180, 20, 80, 80);
        cr.fill();

        cr.arc(330, 60, 40, 0, 2*Math.PI);
        cr.fill();

        cr.arc(90, 160, 40, Math.PI/4, Math.PI);
        cr.fill();

        Matrix mat = new Matrix();
        mat.translate(220, 180);
        mat.scale(1, 0.7);
        cr.transform(mat);

        cr.arc(0, 0, 50, 0, 2*Math.PI);
        cr.fill();
    }

    public static void main(String[] args) {
        Gtk.init(args);
        new GBasicShapes();
        Gtk.main();
    }
}
In this example, we will create a rectangle, a square, a circle, an arc and an ellipse.
 cr.rectangle(20, 20, 120, 80);
 cr.rectangle(180, 20, 80, 80);
 cr.fill();
These lines draw a rectangle and a square.
 cr.arc(330, 60, 40, 0, 2*Math.PI);
 cr.fill();
Here the arc() method draws a full circle.
 Matrix mat = new Matrix();
 mat.translate(220, 180);
 mat.scale(1, 0.7);
 cr.transform(mat);

 cr.arc(0, 0, 50, 0, 2*Math.PI);
 cr.fill();
If we want to draw an oval, we do some scaling first. The scale() method shrinks the y axis.
Colors
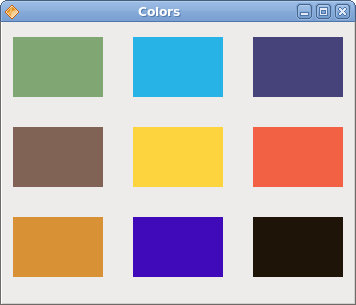
A color is an object representing a combination of Red, Green, and Blue (RGB) intensity values. Cairo valid RGB values are in the range 0 to 1.
package com.zetcode;

import org.freedesktop.cairo.Context;

import org.gnome.gdk.Event;
import org.gnome.gdk.EventExpose;
import org.gnome.gtk.DrawingArea;
import org.gnome.gtk.Gtk;
import org.gnome.gtk.Widget;
import org.gnome.gtk.Window;
import org.gnome.gtk.WindowPosition;

/**
 * ZetCode Java Gnome tutorial
 *
 * This program draws nine rectangles
 * on the drawing area. Each of them
 * has different color.
 *
 * @author jan bodnar
 * website zetcode.com
 * last modified March 2009
 */

public class GColors extends Window
            implements Widget.ExposeEvent {

    public GColors() {

        setTitle("Colors");

        connect(new Window.DeleteEvent() {
            public boolean onDeleteEvent(Widget source, Event event) {
                Gtk.mainQuit();
                return false;
            }
        });

        initUI();

        setDefaultSize(350, 280);
        setPosition(WindowPosition.CENTER);
        showAll();
    }

    public void initUI() {
        DrawingArea darea = new DrawingArea();
        darea.connect(this);
        add(darea);
    }

    public boolean onExposeEvent(Widget widget, EventExpose eventExpose) {
        final Context cr;

        cr = new Context(widget.getWindow());
        drawRectangles(cr);

        return false;
    }


    public void drawRectangles(Context cr) {
        cr.setSource(0.5, 0.65, 0.45);
        cr.rectangle(10, 15, 90, 60);
        cr.fill();

        cr.setSource(0.16, 0.7, 0.9);
        cr.rectangle(130, 15, 90, 60);
        cr.fill();

        cr.setSource(0.274, 0.262, 0.48);
        cr.rectangle(250, 15, 90, 60);
        cr.fill();

        cr.setSource(0.5, 0.39, 0.33);
        cr.rectangle(10, 105, 90, 60);
        cr.fill();

        cr.setSource(0.99, 0.83, 0.24);
        cr.rectangle(130, 105, 90, 60);
        cr.fill();

        cr.setSource(0.95, 0.38, 0.27);
        cr.rectangle(250, 105, 90, 60);
        cr.fill();

        cr.setSource(0.85, 0.57, 0.21);
        cr.rectangle(10, 195, 90, 60);
        cr.fill();

        cr.setSource(0.25, 0.04, 0.73);
        cr.rectangle(130, 195, 90, 60);
        cr.fill();

        cr.setSource(0.12, 0.08, 0.03);
        cr.rectangle(250, 195, 90, 60);
        cr.fill();
    }

    public static void main(String[] args)  {
        Gtk.init(args);
        new GColors();
        Gtk.main();
    }
}
We draw nine rectangles in nine different colors.
cr.setSource(0.5, 0.65, 0.45);
The setSource() method sets a color for the cairo context. The three parameters of the method are the color intensity values.
 cr.rectangle(10, 15, 90, 60);
 cr.fill();
We create a rectangle shape and fill it with the previously specified color.
Transparent rectangles
Transparency is the quality of being able to see through a material. The easiest way to understand transparency is to imagine a piece of glass or water. Technically, the rays of light can go through the glass and this way we can see objects behind the glass.
In computer graphics, we can achieve transparency effects using alpha compositing. Alpha compositing is the process of combining an image with a background to create the appearance of partial transparency. The composition process uses an alpha channel. (wikipedia.org, answers.com)
package com.zetcode;

import org.freedesktop.cairo.Context;

import org.gnome.gdk.Event;
import org.gnome.gdk.EventExpose;
import org.gnome.gtk.DrawingArea;
import org.gnome.gtk.Gtk;
import org.gnome.gtk.Widget;
import org.gnome.gtk.Window;
import org.gnome.gtk.WindowPosition;

/**
 * ZetCode Java Gnome tutorial
 *
 * This program draws ten rectangles
 * with different levels of transparency.
 *
 * @author jan bodnar
 * website zetcode.com
 * last modified March 2009
 */

public class GTransparentRectangles extends Window
    implements Widget.ExposeEvent {

    public GTransparentRectangles() {
        setTitle("Transparent Rectangles");

        connect(new Window.DeleteEvent() {
            public boolean onDeleteEvent(Widget source, Event event) {
                Gtk.mainQuit();
                return false;
            }
        });

        initUI();

        setSizeRequest(590, 90);
        setPosition(WindowPosition.CENTER);
        showAll();
    }


    public void initUI() {
        DrawingArea darea = new DrawingArea();
        add(darea);
        darea.connect(this);
    }


    public void doDrawing(Context cr) {

        for (int i = 1; i<=10; i++) {
            cr.setSource(0, 0, 1, 0.1*i);
            cr.rectangle(50*i, 20, 40, 40);
            cr.fill();
        }
    }

    public boolean onExposeEvent(Widget widget, EventExpose eventExpose) {

            Context cr = new Context(widget.getWindow());
            doDrawing(cr);

            return false;
    }

    public static void main(String[] args) {
        Gtk.init(args);
        new GTransparentRectangles();
        Gtk.main();
    }
}
In the example we will draw ten rectangles with different levels of transparency.
cr.setSource(0, 0, 1, 0.1*i);
The last parameter of the setSource() method is the alpha transparency.
Donut
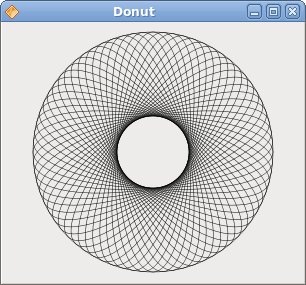
In the following example we create an complex shape by rotating a bunch of ellipses.
package com.zetcode;

import org.freedesktop.cairo.Context;
import org.freedesktop.cairo.Matrix;

import org.gnome.gdk.Event;
import org.gnome.gdk.EventExpose;
import org.gnome.gtk.DrawingArea;
import org.gnome.gtk.Gtk;
import org.gnome.gtk.Widget;
import org.gnome.gtk.Window;
import org.gnome.gtk.WindowPosition;


/**
 * ZetCode Java Gnome tutorial
 *
 * This program draws a Donut
 * shape on the drawing area.
 *
 * @author jan bodnar
 * website zetcode.com
 * last modified March 2009
 */

public class GDonut extends Window
            implements Widget.ExposeEvent {


    public GDonut()  {

        setTitle("Donut");

        initUI();

        connect(new Window.DeleteEvent() {
            public boolean onDeleteEvent(Widget source, Event event) {
                Gtk.mainQuit();
                return false;
            }
        });

        setDefaultSize(300, 260);
        setPosition(WindowPosition.CENTER);
        showAll();
    }


    public void initUI() {
        DrawingArea darea = new DrawingArea();
        darea.connect(this);
        add(darea);
    }

    public boolean onExposeEvent(Widget widget, EventExpose eventExpose) {
        final Context cr;

        cr = new Context(widget.getWindow());
        drawDonut(cr);

        return false;
    }

    public void drawDonut(Context cr) {
        int width = this.getWindow().getWidth();
        int height = this.getWindow().getHeight();

        cr.setLineWidth(0.5);
        cr.translate(width/2, height/2);
        cr.arc( 0, 0, 120, 0, 2 * Math.PI);
        cr.stroke();
        cr.save();

        for ( int i = 0; i < 36; i++) {
            Matrix mat = new Matrix();
            mat.rotate(i*Math.PI/36);
            mat.scale(0.3, 1);
            cr.transform(mat);
            cr.arc(0, 0, 120, 0, 2 * Math.PI);
            cr.restore();
            cr.stroke();
            cr.save();
        }
    }


    public static void main(String[] args)  {
        Gtk.init(args);
        new GDonut();
        Gtk.main();
    }
}
In this example, we create a donut. The shape resembles a cookie, hence the name donut.
 cr.translate(width/2, height/2);
 cr.arc( 0, 0, 120, 0, 2 * Math.PI);
 cr.stroke();
In the beginning there is an ellipse.
 Matrix mat = new Matrix();
 mat.rotate(i*Math.PI/36);
 mat.scale(0.3, 1);
 cr.transform(mat);
 cr.arc(0, 0, 120, 0, 2 * Math.PI);
 cr.restore();
 cr.stroke();
 cr.save();
After several rotations, there is a donut.
Gradients
In computer graphics, gradient is a smooth blending of shades from light to dark or from one color to another. In 2D drawing programs and paint programs, gradients are used to create colorful backgrounds and special effects as well as to simulate lights and shadows. (answers.com)
package com.zetcode;

import org.freedesktop.cairo.Context;

import org.freedesktop.cairo.LinearPattern;

import org.gnome.gdk.Color;
import org.gnome.gdk.EventExpose;
import org.gnome.gtk.DrawingArea;
import org.gnome.gtk.Gtk;
import org.gnome.gtk.Widget;
import org.gnome.gtk.Window;
import org.gnome.gtk.WindowPosition;

/**
 * ZetCode Java Gnome tutorial
 *
 * This program draws gradients.
 *
 * @author jan bodnar
 * website zetcode.com
 * last modified March 2009
 */


public class GGradients extends Window implements Widget.ExposeEvent {

    public GGradients() {

        setTitle("Gradients");

        initUI();

        connect(new Window.DeleteEvent() {
            public boolean onDeleteEvent(Widget source, Event event) {
                Gtk.mainQuit();
                return false;
            }
        });

        setDefaultSize(340, 390);
        setPosition(WindowPosition.CENTER);
        showAll();
    }

    public void initUI() {
        DrawingArea darea = new DrawingArea();
        darea.connect(this);
        add(darea);
    }

    public boolean onExposeEvent(Widget widget, EventExpose eventExpose) {
        final Context cr;

        cr = new Context(widget.getWindow());
        drawGradients(cr);

        return false;
    }

    public void drawGradients(Context cr) {

        LinearPattern lg1 = new LinearPattern(0.0, 0.0, 350.0, 350.0);

        int count = 1;

        for (double j=0.1; j<1.0; j+= 0.1) {
            if (count % 2 != 0) {
                lg1.addColorStopRGB(j, 0, 0, 0);
            } else {
                lg1.addColorStopRGB(j, 1, 0, 0);
            }
        count++;
        }

        cr.rectangle(20, 20, 300, 100);
        cr.setSource(lg1);
        cr.fill();

        LinearPattern lg2 = new LinearPattern(0.0, 0.0, 350.0, 0);

        count = 1;

        for (double i=0.05; i<0.95; i+= 0.025) {
            if (count % 2 != 0) {
                lg2.addColorStopRGB(i, 0, 0, 0);
            } else {
                lg2.addColorStopRGB(i, 0, 0, 1);
            }
        count++;
        }

        cr.rectangle(20, 140, 300, 100);
        cr.setSource(lg2);
        cr.fill();

        LinearPattern lg3 = new LinearPattern(20.0, 260.0,  20.0, 360.0);

        lg3.addColorStopRGB(0.1, 0, 0, 0 );
        lg3.addColorStopRGB(0.5, 1, 1, 0);
        lg3.addColorStopRGB(0.9, 0, 0, 0 );

        cr.rectangle(20, 260, 300, 100);
        cr.setSource(lg3);
        cr.fill();
    }

    public static void main(String[] args) {
        Gtk.init(args);
        new GGradients();
        Gtk.main();
    }
}
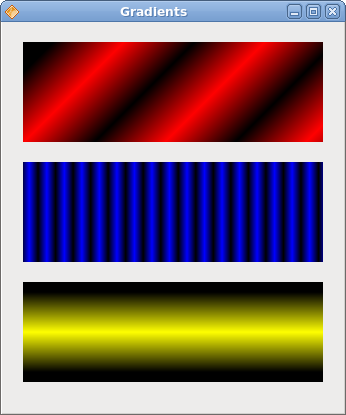
In our example, we draw three rectangles with three different gradients.
LinearPattern lg1 = new LinearPattern(0.0, 0.0, 350.0, 350.0);
Here we create a linear gradient pattern. The parameters specify the line, along which we draw the gradient. In our case it is a diagonal line.
 LinearPattern lg3 = new LinearPattern(20.0, 260.0,  20.0, 360.0);
 lg3.addColorStopRGB(0.1, 0, 0, 0 );
 lg3.addColorStopRGB(0.5, 1, 1, 0);
 lg3.addColorStopRGB(0.9, 0, 0, 0 );
We define color stops to produce our gradient pattern. In this case, the gradient is a blending of black and yellow colors. By adding two black and one yellow stops, we create a horizontal gradient pattern. What do these stops actually mean? In our case, we begin with black color, which will stop at 1/10 of the size. Then we begin to gradually paint in yellow, which will culminate at the centre of the shape. The yellow color stops at 9/10 of the size, where we begin painting in black again, until the end.
Star
In the following example, we create a moving star. The star moves, rotates and grows/shrinks.
package com.zetcode;

import java.util.Timer;
import java.util.TimerTask;

import org.freedesktop.cairo.Context;
import org.freedesktop.cairo.Matrix;

import org.gnome.gdk.Event;
import org.gnome.gdk.EventExpose;
import org.gnome.gtk.DrawingArea;
import org.gnome.gtk.Gtk;
import org.gnome.gtk.Widget;
import org.gnome.gtk.Window;
import org.gnome.gtk.WindowPosition;

/**
 * ZetCode Java Gnome tutorial
 *
 * This program shows an animated star. Rotate,
 * translate and scale operations are
 * applied on the star.
 *
 * @author jan bodnar
 * website zetcode.com
 * last modified March 2009
 */

public class GStar extends Window
            implements Widget.ExposeEvent {

    private static Timer timer;
    private int count;

    private double angle = 0;
    private double scale = 1;
    private double delta = 0.01;

    double points[][] = {
        { 0, 85 }, { 75, 75 }, { 100, 10 }, { 125, 75 },
        { 200, 85 }, { 150, 125 }, { 160, 190 }, { 100, 150 },
        { 40, 190 }, { 50, 125 }, { 0, 85 }
    };

    public GStar() {

        setTitle("Star");

        timer = new Timer();
        timer.scheduleAtFixedRate(new ScheduleTask(), 100, 20);
        count = 0;

        initUI();

        connect(new Window.DeleteEvent() {
            public boolean onDeleteEvent(Widget source, Event event) {
                timer.cancel();
                Gtk.mainQuit();
                return false;
            }
        });

        setSizeRequest(350, 250);
        setPosition(WindowPosition.CENTER);
        showAll();
    }

    public void initUI() {
        DrawingArea darea = new DrawingArea();
        darea.connect(this);
        add(darea);
    }

    public void drawStar(Context cr) {

        int width = this.getWindow().getWidth();
        int height = this.getWindow().getHeight();

        cr.setSource(0, 0.44, 0.7);
        cr.setLineWidth(1);

        Matrix mat = new Matrix();

        mat.translate(width/2, height/2);
        mat.rotate(angle);
        mat.scale(scale, scale);
        cr.transform(mat);

        for ( int i = 0; i < 10; i++ ) {
            cr.lineTo(points[i][0], points[i][1]);
        }

        cr.fill();
        cr.stroke();

        if ( scale < 0.01 ) {
            delta = -delta;
        } else if (scale > 0.99) {
            delta = -delta;
        }

        scale += delta;
        angle += 0.01;
    }

    public boolean onExposeEvent(Widget widget, EventExpose eventExpose) {

        Context cr = new Context(widget.getWindow());
        drawStar(cr);

        return false;
    }

    class ScheduleTask extends TimerTask {

        public void run() {
             count++;
             queueDraw();
        }
    }

    public static void main(String[] args)  {
        Gtk.init(args);
        new GStar();
        Gtk.main();
    }
}
We apply translate, scale and rotate operations on a star shape.
 public boolean onDeleteEvent(Widget source, Event event) {
     timer.cancel();
     Gtk.mainQuit();
     return false;
 }
For a clean exit, we must not forget to stop the timer. Timer is and object of the java util library and is not stopped by the Gtk.mainQuit() method.
 double points[][] = {
     { 0, 85 }, { 75, 75 }, { 100, 10 }, { 125, 75 },
     { 200, 85 }, { 150, 125 }, { 160, 190 }, { 100, 150 },
     { 40, 190 }, { 50, 125 }, { 0, 85 }
 };
These points are used to build the star shape.
 Matrix mat = new Matrix();

 mat.translate(width/2, height/2);
 mat.rotate(angle);
 mat.scale(scale, scale);
 cr.transform(mat);
Here we apply the translate, rotate and scale operations on the star shape.
 for ( int i = 0; i < 10; i++ ) {
     cr.lineTo(points[i][0], points[i][1]);
 }
Here we draw the star.
Waiting
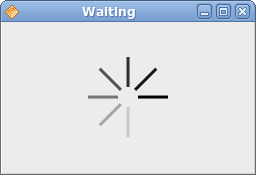
In this examle, we use transparency effect to create a waiting demo. We will draw 8 lines that will gradually fade out creating an illusion, that a line is moving. Such effects are often used to inform users, that a lengthy task is going on behind the scenes. An example is streaming video over the internet.
package com.zetcode;


import java.util.Timer;
import java.util.TimerTask;

import org.freedesktop.cairo.Context;

import org.gnome.gdk.Event;
import org.gnome.gdk.EventExpose;
import org.gnome.gtk.DrawingArea;
import org.gnome.gtk.Gtk;
import org.gnome.gtk.Widget;
import org.gnome.gtk.Window;
import org.gnome.gtk.WindowPosition;

/**
 * ZetCode Java Gnome tutorial
 *
 * This program creates a waiting
 * effect.
 *
 * @author jan bodnar
 * website zetcode.com
 * last modified March 2009
 */

public class GWaiting extends Window
            implements Widget.ExposeEvent {

    private static Timer timer;
    private int count;

    private final double[][] trs = {
        { 0.0, 0.15, 0.30, 0.5, 0.65, 0.80, 0.9, 1.0 },
        { 1.0, 0.0,  0.15, 0.30, 0.5, 0.65, 0.8, 0.9 },
        { 0.9, 1.0,  0.0,  0.15, 0.3, 0.5, 0.65, 0.8 },
        { 0.8, 0.9,  1.0,  0.0,  0.15, 0.3, 0.5, 0.65 },
        { 0.65, 0.8, 0.9,  1.0,  0.0,  0.15, 0.3, 0.5 },
        { 0.5, 0.65, 0.8, 0.9, 1.0,  0.0,  0.15, 0.3 },
        { 0.3, 0.5, 0.65, 0.8, 0.9, 1.0,  0.0,  0.15 },
        { 0.15, 0.3, 0.5, 0.65, 0.8, 0.9, 1.0,  0.0, }
    };


    public GWaiting() {
        setPosition(WindowPosition.CENTER);

        timer = new Timer();
        timer.scheduleAtFixedRate(new ScheduleTask(), 100, 80);
        count = 0;

        initUI();

        connect(new Window.DeleteEvent() {
            public boolean onDeleteEvent(Widget source, Event event) {
                timer.cancel();
                Gtk.mainQuit();
                return false;
            }
        });

        resize(250, 150);
        setTitle("Waiting");
        showAll();
    }

    public void initUI() {
        DrawingArea darea = new DrawingArea();
        add(darea);
        darea.connect(this);
    }

    public boolean onExposeEvent(Widget widget, EventExpose eventExpose) {

        Context cr = new Context(widget.getWindow());
        drawWaiting(cr);

        return false;
    }

    private void drawWaiting(Context cr) {
        int w = this.getWidth();
        int h = this.getHeight();

        cr.translate(w/2, h/2);

        for (int i = 0; i < 8; i++) {

            cr.setLineWidth(3);
            cr.setSource(0, 0, 0, trs[count%8][i]);

            cr.moveTo(0, -10);
            cr.lineTo(0, -40);
            cr.rotate(Math.PI/4f);
            cr.stroke();
        }
    }

    class ScheduleTask extends TimerTask {

        public void run() {
              count++;
              queueDraw();
        }
    }

    public static void main(String[] args)  {
        Gtk.init(args);
        new GWaiting();
        Gtk.main();
    }
}
We draw eight lines with eight different alpha values.
 private final double[][] trs = {
     { 0.0, 0.15, 0.30, 0.5, 0.65, 0.80, 0.9, 1.0 },
     ....
 };
This is a two dimensional array of transparency values used in this demo. There are 8 rows, each for one state. Each of the 8 lines will continuosly use these values.
cr.setLineWidth(3);
We make the lines a bit thicker, so that they are better visible.
cr.setSource(0, 0, 0, trs[count%8][i]);
Here we define the transparency value for a line.
 cr.moveTo(0, -10);
 cr.lineTo(0, -40);
 cr.rotate(Math.PI/4f);
 cr.stroke();
These code lines will draw each of the eight lines.
