PyGTK FAQ Widgets
РңР°СӮРөСҖиал РёР· Wiki.crossplatform.ru
(РқРҫРІР°СҸ: In this part of the PyGTK programming tutorial, we will introduce some PyGTK widgets. Widgets are basic building blocks of a GUI application. Over the years, several widgets became a sta...) |
(РёСҒРҝСҖавил РҪазваРҪРёРө РәР°СӮРөРіРҫСҖРёРё) |
||
| РЎСӮСҖРҫРәР° 648: | РЎСӮСҖРҫРәР° 648: | ||
[[РҡР°СӮРөРіРҫСҖРёСҸ:Python]] | [[РҡР°СӮРөРіРҫСҖРёСҸ:Python]] | ||
| - | [[РҡР°СӮРөРіРҫСҖРёСҸ:GTK]] | + | [[РҡР°СӮРөРіРҫСҖРёСҸ:GTK+]] |
Р’РөСҖСҒРёСҸ 16:43, 19 С„РөРІСҖалСҸ 2009
In this part of the PyGTK programming tutorial, we will introduce some PyGTK widgets. Widgets are basic building blocks of a GUI application. Over the years, several widgets became a standard in all toolkits on all OS platforms. For example a button, a check box or a scroll bar. The PyGTK toolkit's philosophy is to keep the number of widgets at a minimum level. More specialized widgets are created as custom PyGTK widgets.
РЎРҫРҙРөСҖжаРҪРёРө |
Label
The Label widget displays a limited amount of read-only text.
#!/usr/bin/python

# ZetCode PyGTK tutorial
#
# This example demonstrates the Label widget
#
# author: jan bodnar
# website: zetcode.com
# last edited: February 2009

import gtk

lyrics = """Meet you downstairs in the bar and heard
your rolled up sleeves and your skull t-shirt
You say why did you do it with him today?
and sniff me out like I was Tanqueray

cause you're my fella, my guy
hand me your stella and fly
by the time I'm out the door
you tear men down like Roger Moore

I cheated myself
like I knew I would
I told ya, I was trouble
you know that I'm no good"""


class PyApp(gtk.Window):
    def __init__(self):
        super(PyApp, self).__init__()

        self.set_position(gtk.WIN_POS_CENTER)
        self.set_border_width(8)
        self.connect("destroy", gtk.main_quit)
        self.set_title("You know I'm no Good")

        label = gtk.Label(lyrics)
        self.add(label)
        self.show_all()


PyApp()
gtk.main()
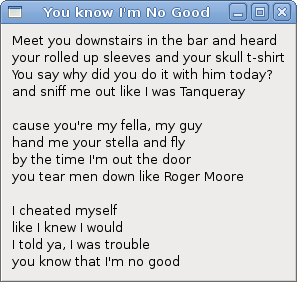
The code example shows some lyrics on the window.
lyrics = """Meet you downstairs in the bar and heard
your rolled up sleeves and your skull t-shirt
..."""
This is the text that we display.
self.set_border_width(8)
The Label is surrounded by some empty space.
 label = gtk.Label(lyrics)
 self.add(label)
The Label widget is created and added to the window.
CheckButton
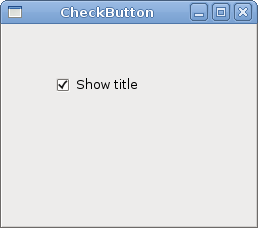
CheckButton is a widget, that has two states. On and Off. The On state is visualised by a check mark. It is used to denote some boolean property.
#!/usr/bin/python
# ZetCode PyGTK tutorial
#
# This example demonstrates the CheckButton widget
#
# author: jan bodnar
# website: zetcode.com
# last edited: February 2009

import gtk

class PyApp(gtk.Window):

    def __init__(self):
        super(PyApp, self).__init__()
        self.set_title("Check Button")
        self.set_position(gtk.WIN_POS_CENTER)
        self.set_default_size(250, 200)

        fixed = gtk.Fixed()
        button = gtk.CheckButton("Show title")
        button.set_active(True)
        button.unset_flags(gtk.CAN_FOCUS)
        button.connect("clicked", self.on_clicked)

        fixed.put(button, 50, 50)

        self.connect("destroy", gtk.main_quit)
        self.add(fixed)
        self.show_all()

    def on_clicked(self, widget):
        if widget.get_active():
            self.set_title("Check Button")
        else:
           self.set_title("")

PyApp()
gtk.main()
We will display a title in the titlebar of the window, depending on the state of the CheckButton.
button = gtk.CheckButton("Show title")
CheckButton widget is created.
button.set_active(True)
The title is visible by default, so we check the check button by default.
 if widget.get_active():
     self.set_title("Check Button")
 else:
     self.set_title("")
If the CheckButton is checked we show the title. Otherwise we put empty text in the titlebar.
ComboBox
ComboBox is a widget that allows the user to choose from a list of options.
#!/usr/bin/python
# ZetCode PyGTK tutorial
#
# This example demonstrates the ComboBox widget
#
# author: jan bodnar
# website: zetcode.com
# last edited: February 2009

import gtk

class PyApp(gtk.Window):
    def __init__(self):
        super(PyApp, self).__init__()

        self.set_title("ComboBox")
        self.set_default_size(250, 200)
        self.set_position(gtk.WIN_POS_CENTER)

        cb = gtk.combo_box_new_text()
        cb.connect("changed", self.on_changed)

        cb.append_text('Ubuntu')
        cb.append_text('Mandriva')
        cb.append_text('Redhat')
        cb.append_text('Gentoo')
        cb.append_text('Mint')

        fixed = gtk.Fixed()
        fixed.put(cb, 50, 30)
        self.label = gtk.Label("-")
        fixed.put(self.label, 50, 140)
        self.add(fixed)

        self.connect("destroy", gtk.main_quit)
        self.show_all()


    def on_changed(self, widget):
        self.label.set_label(widget.get_active_text())

PyApp()
gtk.main()
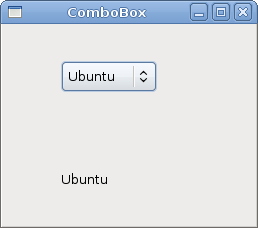
The example shows a combo box and a label. The combo box has a list of six options. These are the names of Linux Distros. The label widget shows the selected option from the combo box.
cb = gtk.combo_box_new_text()
The gtk.combo_box_new_text() function is a convenience function that constructs a new text combo box. It is a ComboBox just displaying strings.
 cb.append_text('Ubuntu')
 cb.append_text('Mandriva')
 cb.append_text('Redhat')
 cb.append_text('Gentoo')
 cb.append_text('Mint')
The ComboBox is filled with textual data.
self.label.set_label(widget.get_active_text())
Inside the on_changed() method, we get the selected text out of the combo box and set it to the label.
Image
The next example introduces the Image widget. This widget displays pictures.
#!/usr/bin/python
# ZetCode PyGTK tutorial
#
# This example demonstrates the Image widget
#
# author: jan bodnar
# website: zetcode.com
# last edited: February 2009

import gtk

class PyApp(gtk.Window):

    def __init__(self):
        super(PyApp, self).__init__()

        self.set_title("Red Rock")
        self.set_position(gtk.WIN_POS_CENTER)
        self.set_border_width(2)

        image = gtk.Image()
        image.set_from_file("redrock.png")

        self.connect("destroy", gtk.main_quit)
        self.add(image)
        self.show_all()

PyApp()
gtk.main()
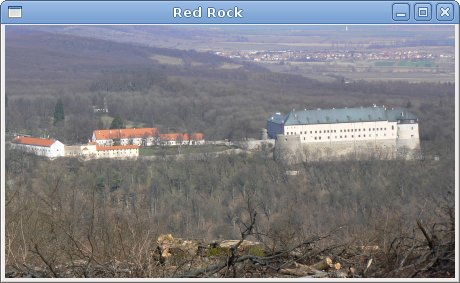
We show the Red Rock castle in the window.
image = gtk.Image()
Image widget is created.
image.set_from_file("redrock.png")
We set a png image to the Image widget. The picture is loaded from the file on the disk.
In this chapter, we showed the first pack of basic widgets of the PyGTK programming library.
Entry
The Entry is a single line text entry field. This widget is used to enter textual data.
#!/usr/bin/python
# ZetCode PyGTK tutorial
#
# This example demonstrates the Entry widget
#
# author: jan bodnar
# website: zetcode.com
# last edited: February 2009

import gtk

class PyApp(gtk.Window):

    def __init__(self):
        super(PyApp, self).__init__()

        self.set_title("Entry")
        self.set_size_request(250, 200)
        self.set_position(gtk.WIN_POS_CENTER)

        fixed = gtk.Fixed()

        self.label = gtk.Label("...")
        fixed.put(self.label, 60, 40)

        entry = gtk.Entry()
        entry.add_events(gtk.gdk.KEY_RELEASE_MASK)
        fixed.put(entry, 60, 100)

        entry.connect("key-release-event", self.on_key_release)

        self.connect("destroy", gtk.main_quit)
        self.add(fixed)
        self.show_all()

    def on_key_release(self, widget, event):
        self.label.set_text(widget.get_text())

PyApp()
gtk.main()
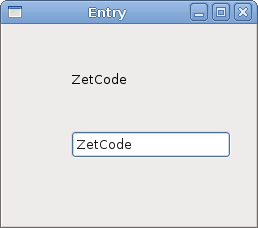
This example shows an entry widget and a label. The text that we key in the entry is displayed immediately in the label control.
entry = gtk.Entry()
Entry widget is created.
entry.connect("key-release-event", self.on_key_release)
If the text in the Entry widget is changed, we call the on_key_release() method.
 def on_key_release(self, widget, event):
     self.label.set_text(widget.get_text())
We get the text from the Entry widget and set it to the label.
HScale
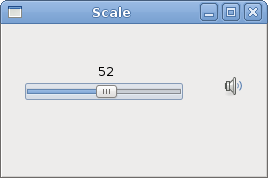
The HScale is It is a horizontal slider, that lets the user graphically select a value by sliding a knob within a bounded interval. Our example will show a volume control.
#!/usr/bin/python
# ZetCode PyGTK tutorial
#
# This example demonstrates the HScale widget
#
# author: jan bodnar
# website: zetcode.com
# last edited: February 2009

import gtk
import sys

class PyApp(gtk.Window):

    def __init__(self):
        super(PyApp, self).__init__()

        self.set_title("Scale")
        self.set_size_request(260, 150)
        self.set_position(gtk.WIN_POS_CENTER)

        scale = gtk.HScale()
        scale.set_range(0, 100)
        scale.set_increments(1, 10)
        scale.set_digits(0)
        scale.set_size_request(160, 35)
        scale.connect("value-changed", self.on_changed)

        self.load_pixbufs()

        self.image = gtk.Image()
        self.image.set_from_pixbuf(self.mutp)

        fix = gtk.Fixed()
        fix.put(scale, 20, 40)
        fix.put(self.image, 219, 50)

        self.add(fix)

        self.connect("destroy", lambda w: gtk.main_quit())
        self.show_all()

    def load_pixbufs(self):

        try:
            self.mutp = gtk.gdk.pixbuf_new_from_file("mute.png")
            self.minp = gtk.gdk.pixbuf_new_from_file("min.png")
            self.medp = gtk.gdk.pixbuf_new_from_file("med.png")
            self.maxp = gtk.gdk.pixbuf_new_from_file("max.png")

        except Exception, e:
            print "Error reading Pixbufs"
            print e.message
            sys.exit(1)


    def on_changed(self, widget):
        val = widget.get_value()

        if val == 0:
            self.image.set_from_pixbuf(self.mutp)
        elif val > 0 and val <= 30:
            self.image.set_from_pixbuf(self.minp)
        elif val > 30 and val < 80:
            self.image.set_from_pixbuf(self.medp)
        else:
            self.image.set_from_pixbuf(self.maxp)


PyApp()
gtk.main()
In the example above, we have HScale and Image widgets. By dragging the scale we change the image on the Image widget.
scale = gtk.HScale()
HScale widget is created.
scale.set_range(0, 100)
We set the lower and upper boundaries of the scale.
scale.set_increments(1, 10)
The set_increments() method sets the step and page sizes for the range.
scale.set_digits(0)
We want to have integer values on the scale, so we set the number of decimal places to zero.
 if val == 0:
     self.image.set_from_pixbuf(self.mutp)
 elif val > 0 and val <= 30:
     self.image.set_from_pixbuf(self.minp)
 elif val > 30 and val < 80:
     self.image.set_from_pixbuf(self.medp)
 else:
     self.image.set_from_pixbuf(self.maxp)
Depending on the obtained value, we change the picture in the image widget.
ToggleButton
ToggleButton is a button that has two states. Pressed and not pressed. You toggle between these two states by clicking on it. There are situations where this functionality fits well.
#!/usr/bin/python
# ZetCode PyGTK tutorial
#
# This example demonstrates the ToggleButton widget
#
# author: jan bodnar
# website: zetcode.com
# last edited: February 2009

import gtk

class PyApp(gtk.Window):
    def __init__(self):
        super(PyApp, self).__init__()

        self.color = [0, 0, 0]

        self.set_title("ToggleButtons")
        self.resize(350, 240)
        self.set_position(gtk.WIN_POS_CENTER)
        self.connect("destroy", gtk.main_quit)

        red = gtk.ToggleButton("Red")
        red.set_size_request(80, 35)
        red.connect("clicked", self.onred)
        green = gtk.ToggleButton("Green")
        green.set_size_request(80, 35)
        green.connect("clicked", self.ongreen)
        blue = gtk.ToggleButton("Blue")
        blue.set_size_request(80, 35)
        blue.connect("clicked", self.onblue)

        self.darea = gtk.DrawingArea()
        self.darea.set_size_request(150, 150)
        self.darea.modify_bg(gtk.STATE_NORMAL, gtk.gdk.color_parse("black"))

        fixed = gtk.Fixed()
        fixed.put(red, 30, 30)
        fixed.put(green, 30, 80)
        fixed.put(blue, 30, 130)
        fixed.put(self.darea, 150, 30)

        self.add(fixed)

        self.show_all()

    def onred(self, widget):
        if widget.get_active():
            self.color[0] = 65535
        else: self.color[0] = 0

        self.darea.modify_bg(gtk.STATE_NORMAL, gtk.gdk.Color(self.color[0],
            self.color[1], self.color[2]))

    def ongreen(self, widget):
        if (widget.get_active()):
            self.color[1] = 65535
        else: self.color[1] = 0

        self.darea.modify_bg(gtk.STATE_NORMAL, gtk.gdk.Color(self.color[0],
            self.color[1], self.color[2]))

    def onblue(self, widget):
        if (widget.get_active()):
            self.color[2] = 65535
        else: self.color[2] = 0

        self.darea.modify_bg(gtk.STATE_NORMAL, gtk.gdk.Color(self.color[0],
            self.color[1], self.color[2]))


PyApp()
gtk.main()
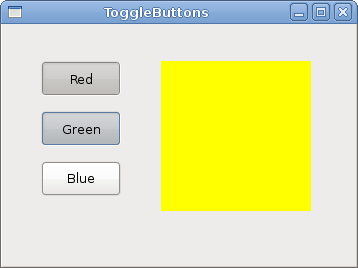
In our example, we show three toggle buttons and a DrawingArea. We set the background color of the area to black. The togglebuttons will toggle the red, green and blue parts of the color value. The background color will depend on which togglebuttons we have pressed.
self.color = [0, 0, 0]
This is the color value that is going to be updated with the toggle buttons.
 red = gtk.ToggleButton("Red")
 red.set_size_request(80, 35)
 red.connect("clicked", self.onred)
The ToggleButton widget is created. We set it's size to 80x35 pixels. Each of the toggle buttons has it's own handler method.
 self.darea = gtk.DrawingArea()
 self.darea.set_size_request(150, 150)
 self.darea.modify_bg(gtk.STATE_NORMAL, gtk.gdk.color_parse("black"))
The DrawingArea widget is the widget, that displays the color, mixed by the toggle buttons. At start, it shows black color.
 if widget.get_active():
     self.color[0] = 65535
 else: self.color[0] = 0
If the toggle button is pressed, we change the R, G or B part of the color accordingly.
 self.darea.modify_bg(gtk.STATE_NORMAL, gtk.gdk.Color(self.color[0],
            self.color[1], self.color[2]))
We update the color of the DrawingArea widget.
Calendar
Our final widget is the Calendar widget. It is used to work with dates.
#!/usr/bin/python
# ZetCode PyGTK tutorial
#
# This example demonstrates the Calendar widget
#
# author: jan bodnar
# website: zetcode.com
# last edited: February 2009

import gtk

class PyApp(gtk.Window):

    def __init__(self):
        super(PyApp, self).__init__()

        self.set_title("Calendar")
        self.set_size_request(300, 270)
        self.set_position(gtk.WIN_POS_CENTER)
        self.set_border_width(2)

        self.label = gtk.Label("...")

        calendar = gtk.Calendar()
        calendar.connect("day_selected", self.on_day_selected)

        fix = gtk.Fixed()
        fix.put(calendar, 20, 20)
        fix.put(self.label, 40, 230)

        self.add(fix)

        self.connect("destroy", gtk.main_quit)
        self.show_all()

    def on_day_selected(self, widget):
        (year, month, day) = widget.get_date()
        self.label.set_label(str(month) + "/" + str(day) + "/" + str(year))

PyApp()
gtk.main()
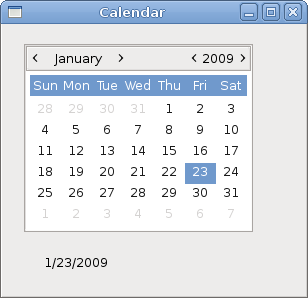
We have the Label. The selected day from the calendar is shown in the label.
calendar = gtk.Calendar()
Calendar widget is created.
 (year, month, day) = widget.get_date()
 self.label.set_label(str(month) + "/" + str(day) + "/" + str(year))
In the on_day_selected() method we retrieve the currently selected date, and update the label.
In this chapter of the PyGTK tutorial, we finished talking about the PyGTK widgets.
